My Go development environment with HTTPS and Dynamic Reloading

Last Friday (May 8th, 2020) I had the day off from work because the company I work for decided to offer everyone two additional PTO days in the month of May in addition to an already generous policy around PTO. What was unique about these two days (internally dubbed “May Days”) is that the time off was Required™ as opposed to voluntary. Even with generous PTO allowances it’s not uncommon to find that employees won’t take time off when they need it for a myriad of reasons.
As an SRE I know those reasons all too well first-hand as prior to last fall I was one of two SREs in the entire company. This meant the on-call rotation saw me holding a pager around 26 weeks out of the year and always living on the razor’s edge of when the next incident to respond to would fall.
So I appreciated the gesture from the company’s leadership team in prioritizing the need for everyone to take some time to rest and recharge. Personally, I spent the first part of the day running some errands and getting supplies from the local hardware store to repair some cracks in the concrete patio in my backyard.
But this blog post isn’t about home improvement, instead I wanted to talk about the other thing I did with some of my time away from “work” which was to play around with the recently released Caddy 2 server and how I’m using it for local Go development with HTTP support.
If you want to skip the verbose step-by-step explanations just skip ahead to the tl;dr.
A basic Go server⌗
For the purpose of this demonstration we need a wicked simple Go http server to fill the role of what we’re developing. The star is going to be Caddy 2 so no need to spend much time scaffolding a Todo App or some other nonsense. Behold! A Go http server in under 20 lines of code.
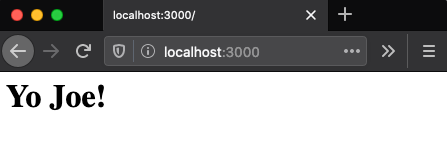
Nothing fancy going on here, just a server listing on port 3000 and returning some basic HTML. If you were to run that with something like go run main.go you should be able to get this very exciting web page when navigating to localhost:3000
Let’s put it in a container⌗
Like all great development the next logical step is to containerize it, right? Well… Maybe. Containers are good for lots of things and also horrible at other things. I find it’s nice to have a simple container that I understand totally for local dev work so that I have a reproducible environment that won’t stop working one day because I installed something funny on my laptop that totally broke one of my projects.
So since we’re working with a super basic Go server let’s make a super basic Go container:
And because I rarely only have the one container let’s also start a Docker Compose config for defining some reasonable defaults and give us room to grow.
At this point you should have a directory with the Go source code, a Dockerfile, and a docker-compose.yml config:
Running docker-compose up will build the container and bind to port 3000 on your local workstation. If you go to localhost:3000 you’ll see we’ve done a lot of work to change nothing about the end user experience.
Isn’t backend development amazing?
Adding Dynamic Reloading⌗
Okay time for the first of our party tricks that this blog post is focused on. If you’ve ever worked with some kind of frontend JavaScript framework you’re likely familiar with the concept of Dynamic Reloading or “hot reloading”. You’re also likely suffering from some degree of JS fatigue and other JavaScript maladies. Fear not, there is no JavaScript in this blog post, you’re safe here.
For those unfamiliar with the concept, it’s essentially a local development trick where the thing your working on (typically a website/app/API) automatically reloads with your latest changes when you save the change in your editor or IDE.
I recently read an interesting post by Jon Calhoun detailing how he built his own little live reloader for Go apps running in Docker containers. It was a fascinating read and if you’re interested in the “guts” of how something like this would work I highly recommend it.
In this case though I’m not really interested in getting into the guts of rolling my own and would rather just use something I found with a 10 second Google search that works reasonably well for my needs 👉 https://github.com/cosmtrek/air
Integrating Air⌗
So it’s pretty simple to add live reloading with Air to our current basic setup. We’ll add a .air.conf file to define how we want Air to build/run our app and then modify the Dockerfile from before to use Air.
First up, let’s add a basic .air.conf file:
That tells Air how to build our project (we’ve got a super simple build, but this could be more complex and use make or some other tooling) and what the binary to run is.
There’s tons more options so if you feel inclined go ahead and review the example config for a full listing of the options.
Next we’ll need to modify our container to have support for Air:
Couple points to call out there, we’ve stopped copying our source into the container image because that was always a bit weird. We’re also simply using go get to install the air binary and then setting that as our entrypoint.
We also need to update the Docker Compose file to mount our source so that Air can build and reload it.
Here we’ve simply added a volume mount placing our current directory into the /app directory inside the container which will correspond to where the image’s working directory is set.
At this point if we re-run docker-compose up we’ll see that we’re now running Air inside our container to build and re-build our source:
Everything should still be pretty uneventful by navigating to localhost:3000
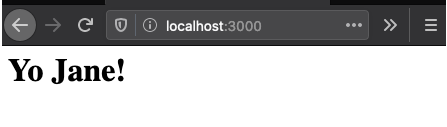
The exciting bit at this point comes by modifying our main.go to change the content our server responds with and then watching as Air automatically detects the change and rebuilds:
And at this point a simple refresh of the web browser and we have our changes ready for preview.
Neat!
Enabling HTTPS on localhost⌗
Last item on our list is to get HTTPS enabled for our local dev server, for this we’re going to use the Caddy server’s recent 2.0 release.
We’ll need a Caddyfile that tells Caddy to reverse proxy requests to localhost to our Go application, this is very simple.
Because we already have a Docker Compose config we can add a Caddy server to our development environment using the official image. I did run into some interesting trouble trusting the self-signed certificate authority so there’s details we’ll step through in this change to docker-compose.yml.
So the first change is we’re now omitting a host port for our Go service. This means that port 3000 in the go container will be bound to an ephemeral port on our host that we largely don’t care about because our Caddyfile config is specifying go:3000 to use Docker’s built-in network to route traffic between our two containers.
For the new caddy container we’re grabbing the 2.0.0 release and mapping port 2020 on our host to the default HTTPS port (443) inside the container.
The volumes config is where things get a little weird. Mounting our Caddyfile to /etc/caddy/Caddyfile is business as usual, however what’s the deal with ./tmp/caddy/pki?
Caddy will automatically enable HTTPS for localhost, but your local machine has to trust the CA root that Caddy automatically creates. More details here: https://caddyserver.com/docs/automatic-https#local-https.
To help you configure your machine to trust this root CA there’s a caddy trust command you can run having first installed Caddy locally (if you need to do this you can find more info here).
But wait! There’s one small problem we haven’t covered. The root CA Caddy generates is going to exist in a Docker container, not our local machine. This means when you run caddy trust you’ll be trusting a root CA specific to your local machine. So what to do? That’s where our volume mount for ./tmp/caddy/pki:/data/caddy/pki comes into play.
By mounting this path on the Caddy container we’ll have local access to the root CA generated in our Caddy container. We still need a way to tell the local install of caddy where these pki files live for when we run caddy trust though. I went looking into the source to see if this is a customizable path and by Matt it is!
Bringing it all together now⌗
At this point we should be able to run docker-compose up to start a container with our Go source live reloading and another container running the Caddy server as a HTTPS terminating proxy in front of our Go server.
Once both containers have started you’ll need to run XDG_DATA_HOME=$(pwd)/tmp caddy trust to trust the root CA Caddy created to sign certificates for localhost.
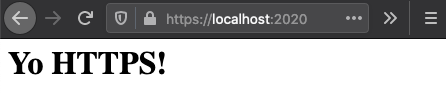
If all is well and good you should be able to navigate to https://localhost:2020 at this point and be met with an HTTPS enabled site 🤘
tl;dr⌗
If this all sounds interesting and you don’t care to do it by hand you can always just go clone an example repo I created as a companion to this post that has the basic config to get you going.
https://github.com/joepurdy/go-dev
Also this is just a start, there’s a TON more you can do with Caddy and the Air libraries I referenced in this post so if you have more specific needs go ahead and experiment.
Liked what you just read? Go ahead and support more content like this by way of my coffee/beer money fund.
 Buy me a coffee